I am not an expert on beginning-of-year procedures.
This is only my second year teaching, and it seems like regardless of how experienced you are, BOY stuff is tricky. You only do it once a year, it's vitally important, and by the time it rolls around again, you've forgotten what worked before.
But never fear.
Today we're going to talk about BOY procedures, why they're important, and what you can do to make your year as smooth as possible. If you have ideas, suggestions, anything else, write them in the comments (or shoot an email to theeverydaylibrary@gmail.com), and I'll do a compilation post!
Why is teaching rules and procedures so important?
Every teacher has heard that it's important to be proactive, especially when it comes to classroom management. Maybe you're thinking to yourself, "But I don't want to spend the entire start of the year teaching kids how to line up. That's SO BORING." Maybe, but do you want to spend the entire year teaching your class to line up? The more you do now, the less you'll have to do later, when you don't have time built in for just this.
Teaching these skills should be built in to the rest of your day (getting-to-know you activities, team building, review work, etc.); of course they'll need more time dedicated to them right now, but start off with the concept that following procedures is just part of a typical day.
Okay, that's fair. But how do I actually teach these things?
I'm going to refer here to one of my favorite books, Tools for Teaching. If you haven't read this book--read it. It's accessible, it's realistic, and it provides lots of examples and practical ways to implement Fred Jones' ideas. It saved my life last year and I've been re-reading it to get ready for this year.
One of Jones' key messages is that too often, we don't actually teach rules and procedures. We just announce them and expect children to pick up on them. You wouldn't just give a verbal explanation of long division and expect someone to be able to do it perfectly, would you? Of course not. You would model each step and gives your class ample time to practice. Regardless of how old your students are, teach them your procedures and practice, practice, practice. Instead of telling students that you want them to line up in a straight line, show them what that looks like. Have them line up in groups and, if needed, arrange students and point out who is doing well. If a group can't line up correctly, make them sit back down and try again--the whole group or class, not just the few students who aren't getting it.
Something else I learned last year that really works is to point out what students are doing right instead of what students are doing wrong. Instead of saying, "Anna, stop jumping around and stand still!", try "I love how Kimayah and Hector are standing quietly, with their arms at their sides." Students love being recognized for doing something well, and it keeps you from giving attention to students who are misbehaving.
I have a teacher friend who teaches first grade, and she said she teaches everything to her kids, from the obvious (bathroom behavior, being quiet in the halls), to the "common sense" (e.g. scissors are for cutting paper, not clothes). She explained that if you don't teach these things, you can't blame the children for not knowing.
What about library procedures?
It can be tougher to teach library rules and procedures since you don't see the same classes every day. Some teachers will bring their class in and explain what's expected from them in the library--I've even had teachers take the time to arrange their class in line or on the rug, and this is incredibly helpful--but you can't rely on it. Make sure you have your own established procedures from the very first day of school. This will help you, the students, and the teachers. That's not to say you can't change and adapt as the year goes on, but it's vital to start strong.
Something I started doing to have every single class, no matter what grade, line up when they came into the library. I put red tape on the ground so they would know where to line up, and after a few weeks of practicing this, they knew exactly what was expected of them: put your books in the book drop, and then line up quietly. I would wait until all of the students were ready (facing me, voices off, bodies still) and give them a quick overview of what we'd be doing that day and what I expected. If we were going to the story rug, students knew what path to take to walk there (because I modeled it for them early on and we practiced walking around the tables, not through them), and if we were going to the tables, students knew where their seats were.
Have library rules posted that are easy for students to see and follow. Make sure you go over these, and bring students' attention back to them as needed. One piece of advice I've gotten is don't make too many rules: 3-5 basic ones should be enough. Too many rules=you going crazy trying to enforce them. All of your rules should come back to creating a positive, respectful learning environment.
I also had a procedure for book checkout. When students had their books picked out, they would line up behind the red tape by the circ desk (duck tape: teachers' secret weapon) and wait their turn to come up to the desk. Having them stay behind the tape kept an aisle open and prevented everyone from crowding the desk. Getting kids to stay behind the tape took a lot of practice (and I mean a lot), but it was worth it. (Another tip: encourage students to keep each other accountable. If someone crosses the line (literally, ha), another student can politely remind them to step back. This is a good way to delegate without encouraging tattling or creating more work for you.)
These are just a few things that have worked for me and that I plan on incorporating this year. Please share your own tips and tricks for a smooth start--and good luck; you can do it!

Friday, August 17, 2018
Friday, August 10, 2018
DIY Book Drop
Some libraries have cool circ desks with built-in book drops and nice, wheelie baskets that the books fall into.
Mine did not.
My strategy at the beginning of the year, to remedy this lack-of-book drop situation, was to put a regular old cart by the door for kids to put their books on. I covered it in contact paper and put a sign on it. It seemed like a decent idea in theory, but people kept taking the cart. (There are few things more disheartening as a first-year librarian than finding your "Book Return" sign on the ground and the cart missing.) Then I would just put out whatever cart I had available when classes came, and if students or teachers popped in to return books, they would leave them on my desk, or my side table, or wherever . . . it was not a perfect system.
The librarian the previous year had cut a big laptop box (one that several laptops had come in--probably four feet high) so that it had a return slot, but my issue with that was you had to very carefully peel the lid off the box (it was on its side), and then bend over and take several trips to carry all the books back to the circ desk. It was a lot of effort and the books went everywhere.
Come February, though, the lack of any cohesive book return method was driving me crazy, so I took matters into my own hands. I told our very creative tech coordinator what I was thinking, and that I wanted to start using the box, but my issue with it was that it was so inconvenient to get the books out. The box was too narrow to fit any of our carts in, and did he have any ideas?
He did, as a matter of fact.
Another convenient aspect of the laptop box was that it had some styrofoam padding, which I tore out of the box and and stuck in the cart to cushion the books (another idea from our tech coordinator). If you don't already have cushioning, a layer of regular styrofoam or anything else would work just as well.
The cart was a little long for the box, so it stuck out the back, and since the basket wasn't huge, it did fill up quickly. But it was a much better system than what had been going on before, and the kids loved dropping their books through the slot. Plus, it looked cool.
This project was a good reminder that even if you don't have all the resources or materials you'd like, you can still do something with almost nothing. Repurposing things is so convenient and cheap--if you don't have all the materials you want or need, ask the custodian or other teachers if they have any items you can use. Another idea: if you have a cart you can slide into box like mine, but no basket on it, stores like target sell some pretty cheap crates that would work well. (I know I have several of these left over from college--repurposing project?)
Project breakdown:
Time: 3 hours (including cutting out letters)
Materials: box, glue, boxcutter, butcher paper, scissors, basket cart, giant box
Cost: free
Worth it? Yes!
Mine did not.
My strategy at the beginning of the year, to remedy this lack-of-book drop situation, was to put a regular old cart by the door for kids to put their books on. I covered it in contact paper and put a sign on it. It seemed like a decent idea in theory, but people kept taking the cart. (There are few things more disheartening as a first-year librarian than finding your "Book Return" sign on the ground and the cart missing.) Then I would just put out whatever cart I had available when classes came, and if students or teachers popped in to return books, they would leave them on my desk, or my side table, or wherever . . . it was not a perfect system.
The librarian the previous year had cut a big laptop box (one that several laptops had come in--probably four feet high) so that it had a return slot, but my issue with that was you had to very carefully peel the lid off the box (it was on its side), and then bend over and take several trips to carry all the books back to the circ desk. It was a lot of effort and the books went everywhere.
Come February, though, the lack of any cohesive book return method was driving me crazy, so I took matters into my own hands. I told our very creative tech coordinator what I was thinking, and that I wanted to start using the box, but my issue with it was that it was so inconvenient to get the books out. The box was too narrow to fit any of our carts in, and did he have any ideas?
He did, as a matter of fact.
 |
| Phase 1--cover in butcher paper |
He went and got the basket cart that held our big books. I had all but forgotten it existed. He took out the big books, and slid it next to the box to compare sizes. It was the perfect width to fit. So I cut off the back of the box, redecorated it, and put it by the door with the cart inside.
 |
| Phase 2: Add letters |
Another convenient aspect of the laptop box was that it had some styrofoam padding, which I tore out of the box and and stuck in the cart to cushion the books (another idea from our tech coordinator). If you don't already have cushioning, a layer of regular styrofoam or anything else would work just as well.
 |
| Phase 3: decorate |
The cart was a little long for the box, so it stuck out the back, and since the basket wasn't huge, it did fill up quickly. But it was a much better system than what had been going on before, and the kids loved dropping their books through the slot. Plus, it looked cool.
 |
| Phases 4-5: cut out the back of the box, add cart |
This project was a good reminder that even if you don't have all the resources or materials you'd like, you can still do something with almost nothing. Repurposing things is so convenient and cheap--if you don't have all the materials you want or need, ask the custodian or other teachers if they have any items you can use. Another idea: if you have a cart you can slide into box like mine, but no basket on it, stores like target sell some pretty cheap crates that would work well. (I know I have several of these left over from college--repurposing project?)
 |
| Finished! |
Project breakdown:
Time: 3 hours (including cutting out letters)
Materials: box, glue, boxcutter, butcher paper, scissors, basket cart, giant box
Cost: free
Worth it? Yes!
Wednesday, August 8, 2018
Fairy Godmother Your Library
My first year as a librarian, I
walked into a library that was a mess. I laugh about it now, but at the
time it was horrifying (and it’s still sad to me that any school would treat
their library that badly). I don’t have a problem with libraries being
used for some storage over the summer, but that wasn’t the case with mine: it
had become a dumping zone. People hadn’t been putting items there to pick
up in the fall; they were putting items there that nobody wanted.
Tons of old podiums, old computers, AV carts--things that I couldn’t
discreetly throw away and that I was being encouraged to keep because “someone
might want them.” Um . . . no.
I was also given an “office”
that wasn’t an office, but a sort of cubicle constructed out of temporary
walls. This was also so full of old stuff that it was unusable (I’ll
write more about constructing an office space later--that was something I chose
not to tackle at the beginning of the year).
In other news, the books
themselves were not organized at all. Melvil Dewey would have
passed out (I nearly did). I remember that first day, there were a few
unshelved books, and I thought, “There’s an easy, basic task I can do and cross
off my list.” It seemed so easy.
That was when I realized that any organizational schema had long been
thrown out the window.
 |
| Agh! That's not how numbers work! |
The circ desk was also gross.
It was PACKED with old stuff and so, so dirty. I didn’t have
anywhere to put my stuff!
Finally, I could tell I was in
a library that hadn’t gotten a lot of love. I wanted to turn it into an
exciting space that teachers and kids would want to visit, but I was given no
supplies.

I also had no budget.
I’m not writing this to
complain--I’m writing it to tell all of you walking into a disaster-zone
library that you absolutely have what it takes to make it better. You
don’t have to do it all at once, and you don’t have to spend a lot of
money. Here are some ways to improve
your zone:
1. Break it down. Rome
wasn’t built in a day, and neither will your new-and-improved library be.
Write down the three most important things for you to do and go from
there. Is there something that
needs to be done before everything else? For me, that was clearing
out the clutter from the main part of the library, because it was really
hard to navigate the space with all that old furniture. I had help
from the custodian and the tech facilitator there (and if all else fails .
. . just stick it in the hall and say, “I’m new. I didn’t know” if someone blames you.
:-)). It drove me crazy that the books were so out-of-order, but that wasn't affecting how I could use or navigate the space, so I tackled that later in the week.
2. Delegate! I
was really lucky to have an assistant (so, so lucky) two days a week, and while
she had never been in my school before, she’d been in the district for several
years. She was so calm and helpful.
It was only later she told me, “I honestly didn’t know if we could get
everything done. I nearly had a panic
attack when you were showing me everything.” If you don’t have an
assistant, don’t worry: you’ll still get done what you need to. Asking friends to come in and volunteer is
another great option.
3. Dress appropriately.
Most schools are pretty lax on dress code during your work days, and I
basically wore workout clothes that entire week. It was hot, and we were
shifting a lot of heavy furniture and scrubbing dirt.
4. Just get through the day. Don’t
overwhelm yourself by worrying about everything all at once. When I
cleaned out my desk (which took about 4 hours--I threw out so much stuff and
this is where the scrubbing came in. There were loose thumbtacks, old, dirty coffee cups in
the desk and half-eaten candy bars.
Ew.), I just went bit by bit and reminded myself how much happier I’d be
when it was done.
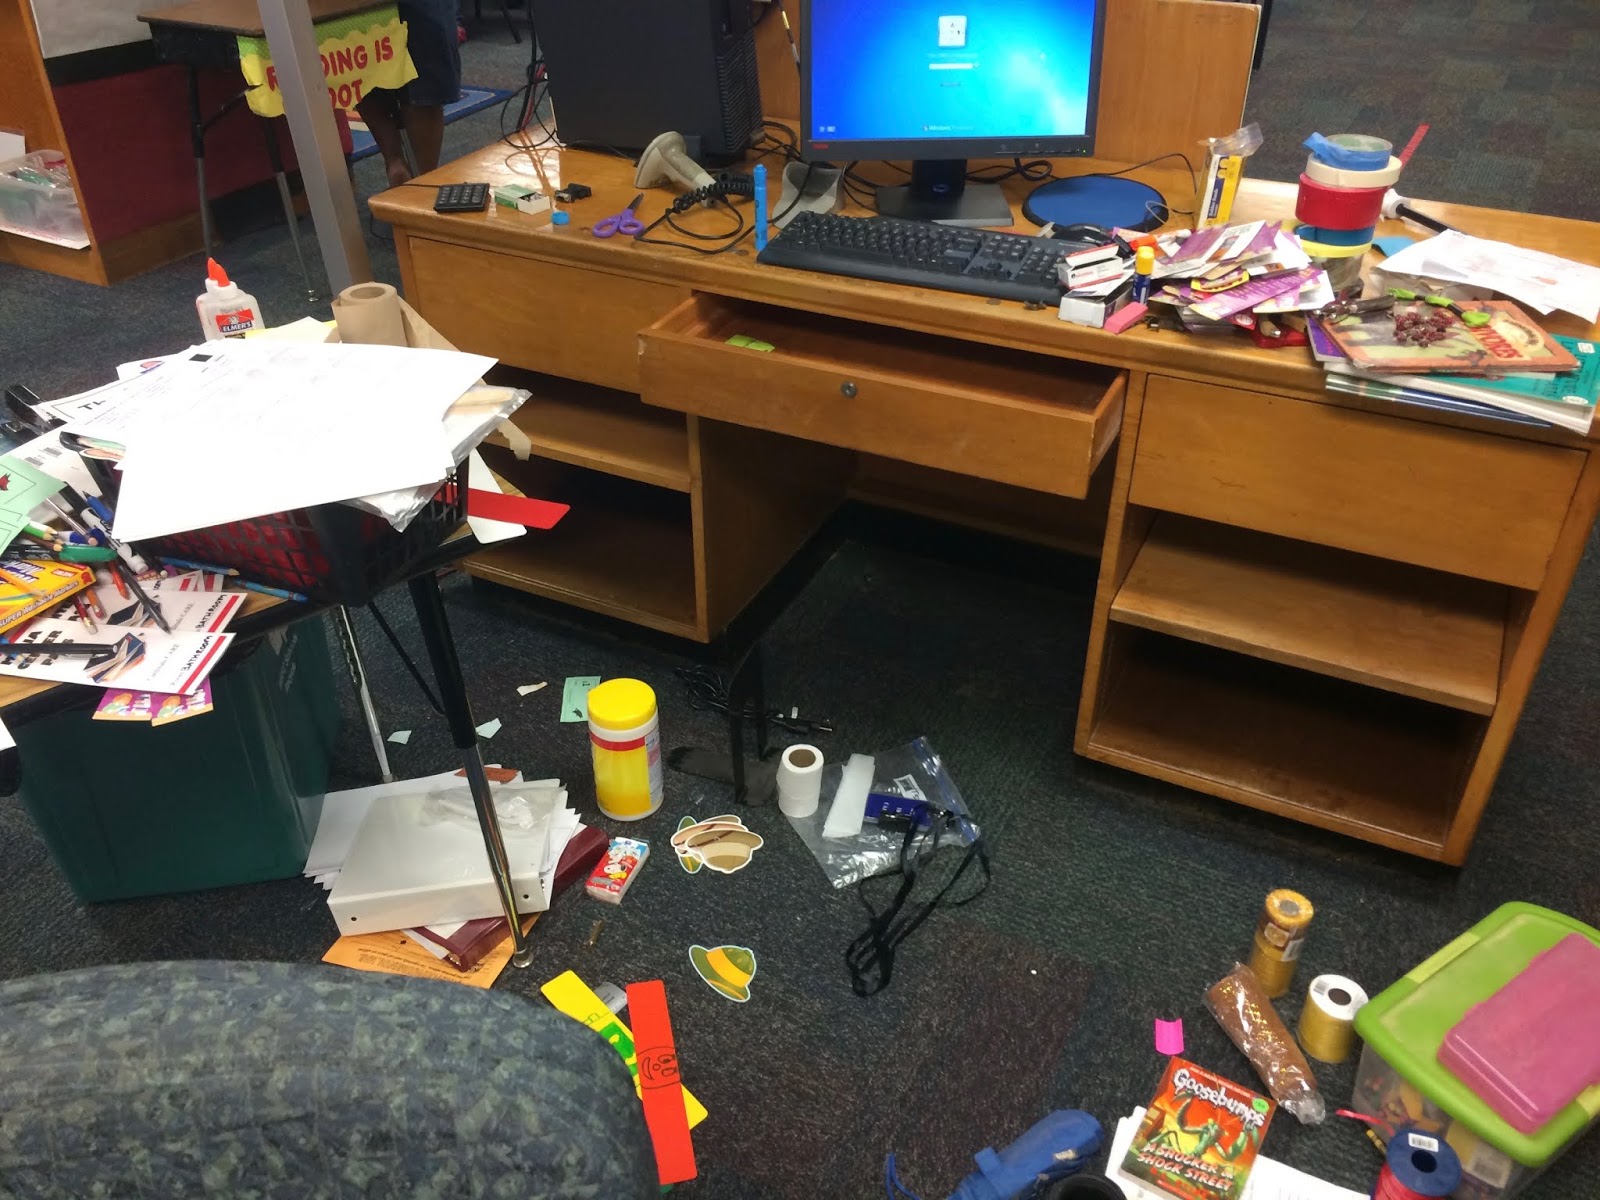 |
| Circ desk or natural disaster site? |
5. “Reward” yourself.
I wanted to make a big poster to welcome people to the library, and since
I really enjoy crafting, I held that as a reward for when my desk was clean and
let myself spend as much time on it as I wanted. And it was worth it--it
looked so bright and happy!

6. Don’t worry about everyone else.
Easier said than done--I felt like I had no idea of what I was doing, and
I was afraid everyone was going to look at the mess in my library and, I don’t
know, think it was my fault? Or that I was crazy for wearing workout
clothes and changing everything? It sounds silly to write it now, but
everything those first few weeks is so overwhelming. Just do what you have to do.
7. Focus on you have.
When I started, I felt like I had nothing. No experience, no
budget, no help (except on the days when my assistant was there), no supplies,
nothing. I woke up in the middle of the night after that first day and
made myself think about what I did have. Which turned out to be
- Lots of craft supplies
- My professors from grad
school and other mentors who I could email for help/advice/support
- 3M strips
- Cleaning supplies
- Enthusiasm
- A work ethic
- My brain
 |
| My box of tricks |
Just remember: you can do it.
You don’t have to do it all at once, and you don’t have to do it alone. Take a few deep breaths, and know that soon this will be the first major
challenge you’ve conquered.
What’s been your biggest
challenge in setting up a space? How did you tackle it?
Monday, August 6, 2018
A Beginning of Year IBL Unit
Happy
August! Are you looking for a way to start the year off by building
community, research skills, and classroom culture? Do you want your
students to start by working together, and give you a chance to gauge their strengths
and weaknesses? Do you want something relatively hands-off for you, the
teacher?
Look
no further.
Inquiry-based
learning can sound daunting, but when put into practice, it’s a great way to
give your students independence and ownership of their learning. It lets
them practice both individual and group skills, perfect for the beginning of
the year. (If you want to learn more about IBL, here’s a good place to start.)
AND,
the packet for the unit is FREE in my new TPT store--check it out here!
IBL on IBL
Objective: students will work in groups to create a model of a
classroom conducive to collaborative learning, aka a “learning lab.” They
will receive a budget to “shop” for items online that they want in their
classroom and work with their groups to determine the best setup, items, and
furniture they want in their room.
Materials:
- Packet
(see TPT link--there are two articles we used that are hyperlinked in this
post, but for copyright purposes, I excluded them from the shareable
version of the packet)
- The packet includes pages for everything you’ll read
about: interview questions and notes, budget sheet, graph paper for
sketching, and reflection pages
- Cardboard
boxes--one for every two groups (you’ll cut these in half)
- Paint/brushes
- Craft
supplies for model building (see below for what we used)
- Hot
glue gun (optional)
I
wrote this unit for a fourth-grade classroom, but it could easily be tailored
to suit any 3-6 grade classroom. Another great thing about this unit? It
directly teaches the students about collaboration and lets them practice
collaborative skills.
My
fourth grade teacher friend, Emily, who I taught this with joked that this is
pretty meta--IBL on IBL.
We
structured this unit over the course of three full days, but I would recommend
dividing it over 5 days, since you probably have lots to cover at the beginning
of the year! I’ll be writing it following the timeline we used, but obviously
do whatever suits your class’s needs.
Day 1
Before
we started, Emily split her class into groups of 4-5, and students sat with
their groups. We started off by having the students read this article on
collaborative classrooms (the article is a bit complex for most elementary schoolers--I
condensed it for our fourth graders) and this one to give them an
idea of what collaboration looks like. The students read the articles and
had a whole-class discussion about them, and each student got to write
something on the board about what teamwork.

Then,
each group made a poster answering the question, “What does teamwork look
like?” As with any IBL lesson, students should have guidelines as to what
you want them answering, but give them freedom in how they present it. We
had some groups who did drawings, some did bullet points, some wrote full
sentences, and some did a bit of everything. The important thing is that
explain their message when they share with the group. After they shared,
we hung their posters up on the board for the duration of the unit.
 |
Group
poster--apologies for the photo quality, but you get the idea!
|
After
ensuring everyone understood what collaboration is (this would be a great term
for a word wall), we moved onto flexible seating. Most students--unless
they have really cool teachers with really cool budgets--think of a classroom
as having desks and tables, so this is a really fun chance to broaden their
thinking. We put together a slideshow of pictures pulled from teaching
blogs, Pinterest, and other online resources to show them innovative classroom
setups, all of which were very different (one of my favorites was very
minimalistic but looked like a log cabin, which the boys especially loved).
Ask students to share what they see and, if necessary, point out
different things in different rooms: bean bags, tables on wheels, different
chairs and stools, standing-height tables, etc.
*Tip: some of the students would look at the
pictures and complain, “Our classroom doesn’t look like that!” Perfect chance
to remind them that the classroom they design can.
Interviews
The
next part of our unit is my favorite, but depending on your school, you’ll
likely have to tailor it. A key part of IBL is community, which is where
these interviews come in. We were lucky to have some great second grade
teachers who accommodated us and let us borrow their classrooms and students.
The
second grade classrooms at our school happened to actually have flexible
seating, so our groups wrote interview questions for the second graders about
their flexible seating. A lot of students haven’t been in charge of
asking other students questions before, so this is a great chance to model what
an interview looks like ahead of time. Each group was expected to have three
questions, and they also had a page in their packet to write answers. We
split our class in half so we didn’t have twenty fourth graders descending on
one classroom.
 |
Teacher-modeled
interview questions
|
Something
we really wanted to do but were unable to was to have an administrator come in
and tell students about what budgets look like for teachers--where does the
money in a school come from, how do teachers have access to it, what are other
ways teachers can get funding for their classroom.
Day 2
Budget
Our
students had an imaginary budget of $1,500 to work with for their classroom.
We gave them a lot of freedom in looking for items, but you could
definitely put together a guide of items and prices if you didn’t want them
exploring too much online--but it was fun to see some of the things students
found! One group found some really cool tables that had adjustable
heights, and another found refurbished iPads for a really good price. This is a
great opportunity to teach students some internet search skills (maybe your
friendly librarian can come in and do a research lesson!).
After
the groups had agreed on what they wanted in their room, they used the graph
paper to draw out how they wanted to set their learning lab up. We didn’t
worry about having them make things to scale--at the beginning of the year, we
weren’t as concerned with that math skill as we were about teamwork and some
basic spatial reasoning.
Day 3
Building
This
is by far the most fun part of the unit. When students have their
blueprints done, they get to start building. This requires the most prep
work on the teachers’ part, but it’s so worth it.
We
got some medium-sized packing boxes from Walmart and cut them in half.
The boxes had enough “floor space” for students to add a lot, but also
shallow enough to be easy to work in. We bought duck tape to do the walls
and let students pick which color they wanted, but I would strongly recommend
you, the teacher, painting the walls ahead of time. We didn’t have enough
time for paint to dry, but taping those boxes took forever!
We
purchased a ton of craft supplies--cotton balls, pipe cleaners, foam sheets,
glitter, glue, popsicle sticks, yarn, etc.--and laid them out for the students.
We also had a glue gun (teacher use only) for harder-to-glue items.

We
gave our groups a few hours to create their masterpieces, and at the end of the
day, we displayed them and the class got to “tour” them. Finally, each
group shared their classroom. Here are two of my favorites:

 |
This
group decided to design a preschool classroom and made lower tables, lots of
beanbag chairs and short stools, a whiteboard, a big teacher chair, and a
board where pictures of the students' families could be displayed. We helped
them string "lights" across the ceiling . . . and they used a lot
of glitter.
|
Reflect
A
crucial part of IBL is reflection--what they learned, what they still want to
learn, and so on. The packet includes a page on this, but if you prefer
to have students use a separate reflection journal, go for it!
Bonus Ideas
- If
you’re lucky to have a generous classroom budget, have your class pick
some items from their models to actually purchase for the classroom.
This drives home that real-world application and gives students a
real sense of ownership of their classroom.
- Alternatively,
set up a GoFundMe page to raise money for your class (if you have
experience using any money-raising site, please share in the comments!).
- If
you incorporate students’ ideas into your classroom, revisit monthly or
quarterly to have students reflect on what’s working and what they would
change or add in the classroom.
- Build
a word wall with terms from the unit, e.g. collaboration, flexible
seating, blueprint, model, learning lab
Subscribe to:
Posts (Atom)
Research with Amazing Animals
Name: Amazing Animals Research Unit Skills: Research, Taking Notes, Print and Digital Sources Resources: Amazing Animals Research Guide , Cu...

-
 Recently Jonathan Stutzman, author of Tiny T. Rex and the Impossible Hug and Llama Destroys the World , wrote on Twitter, “Illustrators...
 -
 Some libraries have cool circ desks with built-in book drops and nice, wheelie baskets that the books fall into. Mine did not. My strate...
 -
 I don't know about you, but when I hear "winter read alouds," I automatically think, "holiday read alouds." And the...